Chocolate (Yep, That’s Right – Chocolate) Tamales

I took a hands-on tamale making class four years ago, and every Christmas I’ve said “This year I’m going to make chocolate tamales”. And every year, well, I didn’t. While the desire to make tamales may not be surprising, the desire to make chocolate ones might be. Why chocolate you ask?
I was born and raised in El Paso, Tx, right on the borders of Mexico and New Mexico so Mexican food is as much a part of my culinary DNA as BBQ and Southern food goodness. When I was in my teens we started having enchiladas, tamales, and all of the fixins on Christmas Eve as many of our neighbors did, and I’ve continued that tradition with my own family. Every year my parents buy tamales from El Paso and bring them to Austin (because Austin tamales aren’t like El Paso tamales at all) and I make the rest of dinner. Even though I have access to some phenomenal tamales, and in general making tamales is a long process, I’ve always wanted to learn how to make them – just because. Enter chocolate tamales.
Although there are things I will do differently next time I make these (and there will definitely be a next time), the results were a hit with family and friends. Along the way I put into practice some important lessons I learned in class, and picked up some other tips as well that I hope will be useful to anyone else who plans to make tamales of any kind. I used recipes and techniques I learned from Jim Peyton, and I highly recommend his various cookbooks (see links to these at the bottom of the post)
Step 1: Soak the Corn Husks
Tamales around the world are wrapped in all kinds of things – from banana leaves to corn husks and more. Ultimately the tamale wrapping needs to be pliable but robust enough to hold up to steaming for at least 90 minutes and of course plentiful. Corn husks fit the bill and are one of the most common tamale wrappers you’ll see. The same markets (or online stores) that carry the corn flour you’ll need for the tamale masa (dough) will most likely carry dried corn husks specifically for making tamales. For the husks to get back to the pliability they have when they are still wrapping corn, you’ll need to soak them in water for at least an hour. To keep the husks submerged in the water while you soak them, put a plate on top of the pile of husks to weigh them down.

Step 2: Make the Masa
This recipe is a double-chocolate whammy, so it includes chocolate in the masa and in the filling. Chocolate tamales are a sweet tamale, so they start with a basic masa mix that uses water and butter in place of the chicken broth and lard you find in traditional savory masa recipes. To make the masa you’ll need:
- 1 ¾ c. instant corn masa flour
- 1 ¾ c. plus 3 Tbsp. water, divided
- 10 Tbsp. butter at room temperature.
- 1 tsp. baking powder
- ¼ c. unsweetened coco (choose a good quality coco like Valhrona and don’t use Dutch processed)
- ¼ c. plus 1 Tbsp. sugar
Before you start mixing your masa, keep the following in mind.
- Start with the right kind of ground corn. Tamale masa is made from a specific kind of high-starch corn that is processed with lime to give it a particular taste and texture. You can’t substitute any other kind of cornmeal for masa. When you’re shopping for this key ingredient, be sure to buy instant corn masa for tamales. In Texas you can find the right masa in just about any grocery store, but in other locals you may need to go to specialty food store, or order the masa online. In El Paso (and I bet many other cities with a large Hispanic population) you can actually buy the masa already made, which for savory tamales is a great shortcut. For sweet tamales like these chocolate ones, you’ll want to make your masa from scratch so you can use water and butter.
- Be sure to give the dry masa time to rehydrate. I’ve looked a variety of recipes and talked to many family friends who regularly make tamales, and if you give the masa mix time to rehydrate you’ll have a better end product. Jim’s recipe says to let the masa sit in the first measure of water for 30 minutes. If the masa looks to stiff, never fear, you’ Il add the second measure of water that the recipe calls for before you’re done mixing the masa.
- Mix the masa long enough to make it light and fluffy. Although you can mix masa by hand – lord knows I watched many of my friends grandmothers doing this while I was growing up in El Paso – you’ll really want to break out your kitchen mixer when you get ready to mix the masa, and a stand mixer is really best. They key to light and fluffy is a lot of mixing to whip air into the masa, so you’ll want to give your masa the full mixing time, and unless you’re after a one-arm workout, let the mixer do the hard wok for you. Be sure to mix your butter until it is light and creamy, and then mix the combined butter and masa until that whole concoction is full of air. Whatever you do, don’t skimp on the mixing time. You’ll know your masa is well mixed enough when a 1 Tbsp. ball of it floats in a bowl of cold water.
Given these tips, mixing the masa is fairly straight forward:
- Mix the masa flour and 1 c. plus 2 Tbsp. water in a bowl until well combined. You may have to get your hands into the mixture to thoroughly combine the two. Cover the bowl with plastic wrap and let the mixture sit to rehydrate for at least 30 minutes.
- Cream the butter in your mixing bowl on medium or medium high speed for at least 2 minutes until it is very light and creamy. Scrape down the bowl as needed to whip air into all of the butter.
- Add the baking powder to the butter and mix for at least another minute.
- Turn the mixer off and add the rehydrated masa to your butter mixture. Mix to combine for 1 minute starting the mixer on low speed and gradually increasing to medium high speed. The mixture should be well combined but still a bit dry.
- Lower the mixing speed to medium and add the remaining ¾ c. plus 1 Tbsp. water to the bowl.
- Increase the mixing speed to medium high and continue mixing for 8 minutes, pausing to scrape down the sides of the bowl as needed.
- Turn the mixer off and add the coco and sugar. Gradually return the mixing speed to medium high and mix for another 2 minutes.
- Test the masa mixture in a glass of cold water to see if it floats. If not, mix for another two minutes on medium high and test again. If the masa still doesn’t float, add more butter to the mixture, 1 Tbsp. at a time until the masa floats.
This is enough masa for about 16 tamales that use about 3 Tbsp. of masa each. Notice the “abouts” liberally sprinkled throughout. You may get 12 or 20 tamales, depending on the actual amount of masa you use for each tamale.
Step 3: Build the Tamales
Most tamales are a combination of masa and filling. For these tamales the filling is very simple: 1 ½. c. of chocolate chips. I chose to use semi-sweet Calibou chips, but you could use bittersweet or even milk chocolate chips, depending on how sweet or not you like your chocolate. You could also use flavored or white chips and the outcome would be tasty.
To build each tamale:
- Take a corn husk out of the soaking plan and place it on a plate with the wide end up.
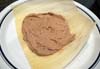
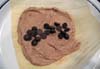
- Place 3 Tbsp. of masa in the middle of the husk. I used a 1 Tbsp. scoop to drop three dollops of the masa on to the husk. This makes a small tamale, but remember that these are a dessert and they have a very intense chocolate flavor, so you don’t want huge tamales.
- Use a spoon (or your fingers) to spread the masa over the corn husk. Leave at least an inch of empty husk on all sides of the masa so the tamale has room to expand during cooking. I discovered that masa that is spread thin results in more rectangular tamales that are very thin. If you leave the masa a little thicker, the tamale is shorter and fatter. My hypothesis is that the thicker masa slides together under its own weight during the early stages of cooking, before the masa sets up, so you get a thicker tamale. Both were very tasty, so this is really your preference.
- Scatter a thin line of chips down the middle of the masa.


To fold the tamales:
- Fold one side of the husk over, followed by the other to enclose the tamale.
-
You have a couple of different options for finishing off the tamale:
- Bottom fold method: Fold the narrow end of the husk up and leave the top open. If you choose this approach you’ll have to steam the tamales standing on one end with the folded end down to prevent masa explosions. I chose this method because it’s the one I’ve always seen used. I discovered that it’s not quite as secure of a method and I did loose a tamale or two along the way in the steamer. If you choose this closing method, be sure to leave enough space between your masa and the bottom of the tamale to make a good, deep fold.
- Twist method: Twist the two ends of the corn husk up like a Christmas cracker and tie them off with a narrow strip of corn husk. If you use this method you can steam the tamales on their sides because both ends will be closed. Of course you’ll have to tie a whole bunch of little knots along the way, but it’s not like tamales are a fast prep food anyway.


Step 4: Steam the Tamales
To steam the tamales, put a steamer basket or insert
into the bottom of a large pot and fill until the water is just below the top of the steamer basket. Line the steamer basket with corn husks and place your tamales in the basket. If you used the bottom-fold method to close up your tamales, stand the tamales on end in the steamer basket. You can lean them up against the side of the pot, and against each other. What is more important is that the open tops of the tamales face up to avoid masa spillage. If you’ve tide both end of the tamales you stack them any which way you want, but don’t pack them in too tightly – you want there to be enough room for the steam to circulate around all of the tamales.

Steam the tamales for an hour and then let them sit for an additional 15 minutes. During steaming, place a damp kitchen towel under the pot lid to keep as much steam as possible inside of your steamer pot.
Presentation and Garnish
Jim’s original recipe for these tamales included serving them with raspberry puree and a chocolate sauce. I chose instead to serve mine with cherry sauce (cherry pie filling will do here in a pinch) and some simple whipped cream. Chocolate and cherries are a classic combination, and the cool creaminess of the whipped cream was a nice counterpoint to the warm masa.
Next Time I Make These I Will…
- Use the twist method to close up my tamales because I think it will lead to prettier dessert tamales.
- Try a different kind of filling – possibly a mint chip.
- Sprinkle some coco powder on the presentation plate.
- Make more – everyone was asking for seconds!
Jim Peyton’s Books
3 Comments
Trackbacks/Pingbacks
- Food Bloggers Celebrate International Chocolate Day — Savor The Thyme - Food, Family and Lifestyle - [...] Clockwise starting on the right: Delectable Gems by Comet Photo Chocolate Chip Cookies by Food Bridge Gluten/Dairy Free Chocolate…
Amazing… I’d never have imagined a chocolate tamale!
your recipe sounds fantastic! i’m filing it away for future reference. here in hawai’i, i just made 13 dozen tamales with another pregnant friend and we’re freezing them for post-partum foods. turns out we have dozens of extra rehydrated corn husks…do you think we can salvage them somehow? short of spreading them out on a hot roof, what techniques would you suggest we use to dry them out for future use? mahalo for any ideas.
this sounds like an incredible recipe! when i was in mexico, i went to a wonderful restaurant and one of their desserts was a chocolate lava cake tamale. i think a good filling would be a chocolate ganache! it would be really easy to fill the tamales with if you make the ganache a day early and refrigerate it…it hardens in a very nice way and would be easy to scoop a teaspoon into the middle of the tamale!